3.09.2010

masculine/feminine pillows


Aren't these pillows so adorable? Guess what? They were FREE to make! Want to make one (or ten)?

I saw how to make these great fabric flowers on V and Co's website and knew I had to try them out! LOVE them!

This is V and Co's photo

I needed something to put these pretty flowers on and I didn't want to add them to existing pillows, so I needed to make some new pillow covers. I will show you how below.

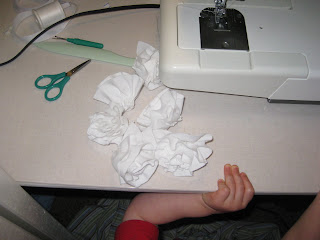
I only changed two things about the flowers: I used old white tab top cotton curtains I had on hand (which was originally a sheet! Major recycling going on!) instead of flannel and upon my mom's brilliant suggestion, I cut them on the bias. This just means I cut the strips out diagonally, not straight across. I did not even measure, just folded the curtain on the diagonal and cut ~1.5 inch wide strips and repeated this process until I felt I had enough strips (about 15 or so, I think). The reason behind cutting on the bias? So I would not have to hem them and they would not ravel. Did I mention brilliant??? I even ran the strips through the regular wash and dry cycles to make sure they would be okay and THEY WERE! Here are the flowers that I made:

Next...talk about reduce, reuse, recycle...man I was able to do all that! My husband was getting rid of loads of clothes he no longer wanted and there were a bunch of button down shirts. He had them all bagged up ready to set out on the curb for the Veteran's Fund to come pick up. Well, I dug into them before they were curbside and pulled out a few. I cut the body the of 2 shirts into squares that would fit a small pillow form I had. (One of the shirts had little pink strawberry chapstick stains. No one would want to wear it anyway, so I did not feel soooo guilty about taking them out of the Veteran's Fund bag.) I cut the squares a little off center to accommodate the pocket that I wanted on the pillow.


The most excellent part of using an old button down shirt is that you don't have to put in a zipper!!! I cannot put in a zipper to save my life (nor have a really tried and don't really want to thank you very much), and I MUST be able to take pillow covers off to wash them, so this was perfection!


I needed another pillow form in order to make two same sized pillows, so out of the same white cotton sheet-turned-curtain-turned flowers, I made another pillow form. Then my little elf came and helped me fill it with batting I already had on hand.


Here is the finished pillow form and cover. I can't get these 2 photos to flip around for some reason (so frustrating when blogspot does that!).

The other side of both pillows.

Next, I sewed 5 of the flowers on the corner of each of the pillows for a nice BIG rufflely flower effect!
And voila! All done and sitting pretty on our couch ready for spring! Masculine on one side and feminine on the other!
Thank you
V and Co for the lovely flower tutorial! I was just thinking how these flowers would even be cute done in a print...hmmmmm...I may have to get on that!

3.02.2010

one last bird mobile


This bird mobile is for a little boy who is turning one year old next week. I decided to go crazy and mix up the colors a little. In reality, I just did not have embroidery floss in the correct color blue, so I decided to try out using contrasting colors and I am surprised that I actually like it. It is not my usual style and would not pair well with the decor in my house, but it will in the little boy's room where these little birdies will call home.

My stitching needs a little improvement, which is a major understatement! You would think that with a mom who is a professional seamstress (and a teacher at that!), I would have neat, cute, perfect stitches, but sewing has never been my strong suit. This is no reflection on my mom's teaching abilities, let me tell you, she has tried! I still give sewing a shot though and I have learned a thing or two!

I just liked the look of this little bowl o' birdies. Someday, I want to try out these little sweetie birds on Made Stuff that I just found, which are much cuter than my little birdies!
And look what I just found! Martha never fails!!! A pattern for the "breasted" bird as I will call it since I can't think of a spiffier name.. .

port-a-nap


I am digging through my photo archives and finding a bunch of crafting I did several years ago. This little project is displayed on my favorite chair-my toile glider that Matt bought me before we even were thinking of having children. I loved it then and I love it now for rocking my sweet one every day.
Anyhow, this photo was from 2006. I have made a few of these "port-a-naps" for my friends' children over the years. Basically, the "port-a-nap" (snappy name that hubby came up with!) is a quilt (meaning two pieces of fabric with batting in between and stitched in intervals with embroidery floss, since I am not a quilter. Stayed tuned for another post where I attempt quilting and prove this fact!), and a pillow with a cute matching pillow case. The quilt and pillow are bundled up with a co-ordinating ribbon with a snap so the child (or parent)can carry them together over their shoulder. I think I need to make some more of these!

beaded purses


I ran across the photos of these purses that I made ages ago (2003 or '04??) for a Weimaraner Rescue auction. I can't remember which one it was, as there have been quite a few. I beaded glass and plastic beads and the coiled them around until I found the right shape for the type of dog I wanted. I added some features with beads, then I sewed them onto some purses my mom had given me to create with and added a little bead to the zippers. I have to admit, the white "dog" on the cute little pink coin purse looks more like a bunny than a dog, but hey, not much I can do about that now, huh? hehe!
p.s. I blured out my e-mail since it is an old one.

love on a stick

I recently had a relative loose her beloved mommy. I wrote a note and then felt the desire to include something with it that would fit in an envelope. I once again turned to my old friend, Mr. Felt. I was looking around my craft nest and saw colored craft sticks and decided to make "love on a stick" to stick in the envelope. I hope it was able to brighten my relative's day, just a smidgen.

2.25.2010

2.24.2010

5 weekends of naps, 1 MTO & $140

I posted this a while back on my personal blog, but I am now transferring it here as one of my completed projects! I have no idea why it is publishing with all caps when in my perview mode it is with upper and lower cases.

Last summer our street had a neighborhood yard sale. Of course, baby and I had to go check it out. I had been on the look out for a dresser to overhaul and I had actually already bought one from Craig’s List a month prior for $45, delivered, but it turned out not to be what I was looking for. Well, as my son and I were strolling around with a few toys we purchased waiting for us a few houses away, we came across a Mid Century Modern Danish dresser that was in dire need of a reno! My heart started beating fast and I raced to find the owner to ask how much it was. She said it was $5 and since I had $4 one dollar bills, she gave it to me for four buckaroos! Later that day, some men brought it down to me in a trailer and set it on top of the other dresser I bought in the garage. My heart was beating even harder and faster now because I knew I would have a mad husband to placate when he pulled into the garage after getting home from work that night--but I had to have it, you see.
The dresser sat there for a month as I pondered over my many ideas of how to revamp it. It sat there a few weeks more after I decided I wanted to face it with mirror. Then in July of last year I priced mirrors and compared glass to acrylic. A man came over to measure it from the Glass Doctor and I placed my order (for glass, not acrylic, since it scratches easily).
One weekend in August I decided to start my mission. I put baby down for a nap and raced to the garage with my grubbies on and started stripping the paint away. Then, right before I thought he would wake up, I raced to take a shower so I would not smell of that toxic remover. This process continued for the sanding--and more sanding--and even more sanding for several weeks. Then on to staining (x2) and finally the polyurethane (x2). Many naps and showers later, I was ready to apply the mastic to the dresser and stick the mirrors on. Then after baby went to bed, hubby helped me lug it up the stairs to the guest room (I wanted it in the downstairs entry but hubby-the-design-guru did not concur). So after 5 weeks of naps, an MTO (cost cutting mandatory time off from the job) when my lovely mom watched baby, and $140 later, it was finally done! Now, maybe I will do something with that other dresser in the garage after all!

more scraping...

a dirty job...

getting there...

Sanding...
more sanding...


done sanding!

1st coat of stain
2nd coat and poly

Adding the mirrors...

Mission Accomplished!

4 comments

2.22.2010

my sweet little helper

I recently cleaned up the guest room from all the "construction" zone craziness that accompanied the craft nest creation. This allowed for my son to join me in the room for the first time. Oh what joy it brought to my heart to have him in my craft nest with me while I created and he played with felt at my feet! I cannot tell you how wonderful a feeling that was. He took the felt out of the jar and put it back in. Took a little detour to play with something else and then came back to it. Joy of joys!

I also bought him several sets of flash cards to play with from Target's $1 bins a month or two ago since he loves photos and paper products. On his changing table I give him a few animal flash cards to hold and we make noises of the animals to keep him distracted enough not to flip over (which he can do in less than a second with no notice!). I had a set of presidents flash cards that he had not seen yet and gave those to him to sort through and play with as well. Very fitting for all the presidents' birthdays in February!

I remember very fondly sorting through my mom's button jar as she sewed. I would organize them by color or type in muffin tins--oh so fun!!! I hope my son will find sweet moments as I did and then someday even begin creating himself. He had a head start on that a few months ago when I melted down old crayons and molded them in a rainbow of layered colors in a heart shaped silicone mold. He colors with the crayon hearts once in a while. He also got some markers last week that he got to scribble with under close supervision. But I digress..it was such a wonderful experience to have two of my loves, my son and crafting (one much greater than the other), in the same room!
p.s. I could not believe he actually wanted to wear a hat! He chose this pumpkin hat to wear and kept it on for much of the weekend. Maybe he will be a hat wearer after all! Hurrah!

button pin cushion


While working on my little felt birdies, I needed to have a handy place to put my needles since I was using a needle wheel which was does not accommodate threaded needles. I turned to my trusty felt again. I just happened to have the same pink and green colors as my craft nest. I just needed to come up with a shape. I thought of a dog, a mouse, a pig...no, i just can not poke needles into an animal--too weird! I needed an inanimate object to model my pin cushion after. And a button it was!
It is reminiscent of sewing, so it seemed the perfect fit. I traced a jar that was sitting on my desk as the circle for the the larger light green circle and also the darker green ring around the outside of the button. I just freehand cut the inside of the darker green circle to expose the lighter green felt. I sewed them together with my trusty invisible Ikea thread (I've had this thread for at least 4 years and just now started using it--now I want to buy some more!).
Next, I freehand cut some bright pink circles for the button holes and sewed them on and voila! A pin/needle cushion for all those wayward needles!

new use for shelf


I adore finding new uses for old things, or new uses for something not as it was intended. While trolling the asiles of Lowes a few weeks ago I saw some glass shelves on clearance and wondered what I could do with them. I decided to get one that was 12"x12". It was only about $4! I thought I could use it as a cutting board for my craft nest. I already had a small glass rectangle that came with my circle cutter, but the edges were not rounded and it was a small size. The best part? The circle cut outs in each of the corners! It makes it so easy to pick up!