3.25.2010

sandwich wraps (with update)

I have been using foil to wrap my sandwiches for work so I could also use it as a place mat on my desk. It was very wasteful. I have seen these sandwich wraps around a lot, but the ones I saw to buy were the pocket kind and I wanted a "place mat" kind. I also thought, "I could make that!" but I did not know what to use for the liner since I did not want to use something toxic. Enter Towards Sustainability, an Aussie Mommy Blogger. She used a ZIPLOCK baggie!!! Genius! Please see her tutorial. Like she says on her blog, who knows what kind of chemicals are yet to be found in Ziplocks, however, they currently are food grade!
So I set out to make my very own sandwich wraps and I even made a snack pocket to match. They were so easy to make and I kept going! All 4 of my sustainable home-made-lunch-ware are from 2 one-gallon size freezer baggies—think of all the use we’ll get out of them!


Another pattern. Basically, I made these for almost nothing. I had the square patterned fabric and the Ziplocks on hand. I bought the below fabric last week in the remnant section for 50 cents!
Matching snack pack for dry snacks, like pretzels or Cheerios, or granola.....
Sewing around the edges after turning it right side out to make it lie flat.

After all 4 Velcro pieces were sewn on. And miracles of miracles- it works!


Now for the bloopers section: I made a few mistakes on the first one, so let me share them with you in case you want to try a wrap out for yourself. I fixed them on my later attempts. 1) I did not cut the plastic and fabric out square. It was 10”x11”. I don’t know why I thought that would work. 2) I drew the piece of bread on the plastic “square,” not diagonally –I should have followed directions! I decided not to even bother drawing on the other 2 I made. 3) I left a stray piece of thread between the plastic and the fabric.

The mistake I made on the snack pack was, I did not sew on the bottom piece of Velcro before sewing it into the pocket shape. Therefore, I could not machine sew it (as the pocket was not big enough for the machine to get inside. I had to sew it by hand instead. No biggie!
None of these things factor into the usability of the end product, thank goodness!
I have washed one of the wraps in the washer and laid it outside on a towel to dry and so far so good! I washed it on the delicate cycle. The other 3 are in the wash now. I stuck them in a lingerie bag and used the regular cycle...we'll see!
The REAL test is taking a sandwich to work! I am doing that tomorrow so I'll have to let you know!
P.S. I am changing fonts. The Courier was just not working for me! Trying out the Trebuchet.
UPDATE 03.25.10: The wraps I made were a bit to large so I will need to move the Velcro in a little more from the border. Perhaps about an inch so that it will tightly seal in the sandwich. Otherwise, I am very happy with my little sandwich wraps! I used the snack pack today to take an English muffin to work and it was a perfect fit! Very happy! And I have washed all of the wraps and the snack pack in lingerie bags on the gentle cycle and laid them outside on a towel or on top of the dryer on a towel to dry. The outside method was a tad faster, but there is the risk of the wind blowing them away since I did not hang them from a line!

3.22.2010

more birds

I guess the my craft nest is making me bird brained! Here is a ridiculously easy project. Remember when I covered a Dollar Store bird with pages from the thesaurus? Well, while I was there I picked up 2 little ceramic birdies. Pretty okay as they are I guess... ..but better with paint right?
but not glossy like I envisioned, plus the brush stroke were showing.


So I spray painted one high high gloss white, which was sitting in the garage and the other satin magenta which was left over from my pink peg board.
Now they are 2 little love birds sitting on my mantle.

3.18.2010

wordy bird

photo from A Lovely Place to Land
What do you get when you combine an old thesaurus, Mod Podge and a bird from the Dollar Store? I saw this project over at A Lovely Place to Land. The same week I saw this post I ran over to the Dollar Store just to pick up a couple of these birdies to try it out and I am very happy with the results.

I have not yet decided if I want to give him eyes yet. What do you think?
This little guy has been perched in my craft nest, but I think he may want to fly downstairs and check out the mantle for Easter and Spring!

Thank you Amanda for posting your creative idea!

Michael's $ bin

I scored at Michael's last weekend! First of all, I had been given 2 Michael's gift cards for my birthday last week and I went to Michael's with no plans about what I should get. I just wanted to get whatever struck my fancy. All of the below were from the dollar bins and either one or two dollars each! So exciting! I got several other things too, but the below things were very exciting to me!
Green polka dot packing tape! I didn't realize until I got it home that it matches my craft nest peg board!!!


I needed some toys for our son to play with on the air plane when we travel cross country. Requirements: small, lightweight, quiet and hopefully time-consuming! Michael's had plenty of toys for $1-2! I realize of course that I could have made the thread through trucks, but for one buck! It is not worth the time!

And a magna-doodle for $1!!! It's not the best quality, but again, for one buck...!? (I realize now that i forgot the "y" on voyage! oh well!) The green half circle is a turtle where kids can stick little self-adhesive foam "tiles" on the turtle's shell and stick the head, legs, and tail on the shell. I'm not sure if an 18 month old will get the big picture, but it will be fun and take some time. And look, it all fits in the shirt sleeve drawstring bag from last week! Another travel related accessory. I have been trying to figure out how to travel with a sippy cup of milk and keep it cold without having to lug around a insulated lunch box. This is an insulated water bottle holder with strap in white canvas. Not sure how to decorate it yet, any ideas???

Get yourself to Michael's!!!

3.13.2010

drawstring bags from shirt sleeves

Remember those button-up shirt pillows from earlier this week (see below post)? Well I needed to do something with the sleeves and the rest of the shirts and I’ve been wanting to make some drawstring bags for traveling (keeping all those baby socks together, keeping shoes from touching my other packed items, having a lightweight bag from which to pull toys from when on the plane,etc). Well, I put those scraps to good use last night.

I kind of made up the pattern for each one a little differently and even put the drawstrings in differently in each one…learning as I went. I recall seeing Martha’s drawstring bags in her magazine last month (but could not find on them her website) and her directions are probably good (she is THE Martha, after all—maker of all “good things”) but I did not follow them. Who has time to follow directions when trial and error is so much more fun?

Here is what I ended up with.

Here they are re-arranged after baby walked over them.

We even used one today to pack our son’s lunch in when we went to the zoo! You can see that the sewing is a mite pitiful, but who cares? They are functional!


I will probably be making a bunch more of these. I have an awesome idea for one that I will save for later, so stay tuned! Not sure when it will come to fruition since I want it for a room that I have yet to decorate, but have some BIG ideas for!!! I am so excited, but I think it will have to wait a while since I will need some large chunks of time which, so far, I have yet to find! Oh how I wish that dang job was not in the way, but I could still make money!

3.09.2010

masculine/feminine pillows


Aren't these pillows so adorable? Guess what? They were FREE to make! Want to make one (or ten)?

I saw how to make these great fabric flowers on V and Co's website and knew I had to try them out! LOVE them!

This is V and Co's photo

I needed something to put these pretty flowers on and I didn't want to add them to existing pillows, so I needed to make some new pillow covers. I will show you how below.

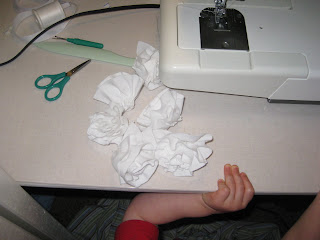
I only changed two things about the flowers: I used old white tab top cotton curtains I had on hand (which was originally a sheet! Major recycling going on!) instead of flannel and upon my mom's brilliant suggestion, I cut them on the bias. This just means I cut the strips out diagonally, not straight across. I did not even measure, just folded the curtain on the diagonal and cut ~1.5 inch wide strips and repeated this process until I felt I had enough strips (about 15 or so, I think). The reason behind cutting on the bias? So I would not have to hem them and they would not ravel. Did I mention brilliant??? I even ran the strips through the regular wash and dry cycles to make sure they would be okay and THEY WERE! Here are the flowers that I made:

Next...talk about reduce, reuse, recycle...man I was able to do all that! My husband was getting rid of loads of clothes he no longer wanted and there were a bunch of button down shirts. He had them all bagged up ready to set out on the curb for the Veteran's Fund to come pick up. Well, I dug into them before they were curbside and pulled out a few. I cut the body the of 2 shirts into squares that would fit a small pillow form I had. (One of the shirts had little pink strawberry chapstick stains. No one would want to wear it anyway, so I did not feel soooo guilty about taking them out of the Veteran's Fund bag.) I cut the squares a little off center to accommodate the pocket that I wanted on the pillow.


The most excellent part of using an old button down shirt is that you don't have to put in a zipper!!! I cannot put in a zipper to save my life (nor have a really tried and don't really want to thank you very much), and I MUST be able to take pillow covers off to wash them, so this was perfection!


I needed another pillow form in order to make two same sized pillows, so out of the same white cotton sheet-turned-curtain-turned flowers, I made another pillow form. Then my little elf came and helped me fill it with batting I already had on hand.


Here is the finished pillow form and cover. I can't get these 2 photos to flip around for some reason (so frustrating when blogspot does that!).

The other side of both pillows.

Next, I sewed 5 of the flowers on the corner of each of the pillows for a nice BIG rufflely flower effect!
And voila! All done and sitting pretty on our couch ready for spring! Masculine on one side and feminine on the other!
Thank you
V and Co for the lovely flower tutorial! I was just thinking how these flowers would even be cute done in a print...hmmmmm...I may have to get on that!

3.02.2010

one last bird mobile


This bird mobile is for a little boy who is turning one year old next week. I decided to go crazy and mix up the colors a little. In reality, I just did not have embroidery floss in the correct color blue, so I decided to try out using contrasting colors and I am surprised that I actually like it. It is not my usual style and would not pair well with the decor in my house, but it will in the little boy's room where these little birdies will call home.

My stitching needs a little improvement, which is a major understatement! You would think that with a mom who is a professional seamstress (and a teacher at that!), I would have neat, cute, perfect stitches, but sewing has never been my strong suit. This is no reflection on my mom's teaching abilities, let me tell you, she has tried! I still give sewing a shot though and I have learned a thing or two!

I just liked the look of this little bowl o' birdies. Someday, I want to try out these little sweetie birds on Made Stuff that I just found, which are much cuter than my little birdies!
And look what I just found! Martha never fails!!! A pattern for the "breasted" bird as I will call it since I can't think of a spiffier name.. .

port-a-nap


I am digging through my photo archives and finding a bunch of crafting I did several years ago. This little project is displayed on my favorite chair-my toile glider that Matt bought me before we even were thinking of having children. I loved it then and I love it now for rocking my sweet one every day.
Anyhow, this photo was from 2006. I have made a few of these "port-a-naps" for my friends' children over the years. Basically, the "port-a-nap" (snappy name that hubby came up with!) is a quilt (meaning two pieces of fabric with batting in between and stitched in intervals with embroidery floss, since I am not a quilter. Stayed tuned for another post where I attempt quilting and prove this fact!), and a pillow with a cute matching pillow case. The quilt and pillow are bundled up with a co-ordinating ribbon with a snap so the child (or parent)can carry them together over their shoulder. I think I need to make some more of these!

beaded purses


I ran across the photos of these purses that I made ages ago (2003 or '04??) for a Weimaraner Rescue auction. I can't remember which one it was, as there have been quite a few. I beaded glass and plastic beads and the coiled them around until I found the right shape for the type of dog I wanted. I added some features with beads, then I sewed them onto some purses my mom had given me to create with and added a little bead to the zippers. I have to admit, the white "dog" on the cute little pink coin purse looks more like a bunny than a dog, but hey, not much I can do about that now, huh? hehe!
p.s. I blured out my e-mail since it is an old one.

love on a stick

I recently had a relative loose her beloved mommy. I wrote a note and then felt the desire to include something with it that would fit in an envelope. I once again turned to my old friend, Mr. Felt. I was looking around my craft nest and saw colored craft sticks and decided to make "love on a stick" to stick in the envelope. I hope it was able to brighten my relative's day, just a smidgen.