10.22.2011

cowboy party ~ horse piñata

My 3 year old's cowboy/wild west party is coming up next week so last week, pretty much every evening after work and after the almost-3-year -old was in bed, I worked on this:

I used Oh Happy Day's technique to cut out the shape and tape it all together.

The Safeway produce man helped out by giving me a few apple boxes to cut up. It had a few "air holes" but they were easy enough to cut around.
I free-handed the horse shape and cut it out with a combination of scissors and box cutter.

photo courtesy of 3 year old photographer who kept busy taking photos so mama could draw and cut out the horse.
 Cut out 2 of the same shape.

I then used a cereal box (not shown) cut in in 3 or 4 inch strips to bend around the horse's shape and duct taped it all together. The cereal boxes are much more pliable than big cardboard boxes and worked well to go around the bends.
Here is the almost-birthday boy (who refused to put his shirt back on) with the piñata to show the scale. He wanted to ride it!
 Heading into the "the barn"


Then came the looong part. I cut folded strips of tissue paper (of varying sizes) and then fringed them while they were still folded. Then unfolded them and hot glued them to the piñata, starting at the hooves and working my way up to the top.

For the sides (where the cereal box was taped on) I just glued on the tissue paper in a strip and didn't worry about fringing it.

For the tail I just cut strips of yarn and tied them together and hot glued them on. The mane is self-explanatory.
And her were are: the final product:
We'll find out if it was all worth it at next weekend's party!

10.16.2011

bedroom curtains, oh yeah and lamps!

I finished our bedroom curtains several months ago (May?), but have forgotten to take any photos. These are not the best, but they will do. Since hubster works at night most of the time we needed blackout curtains but I could not find long enough ones that went from floor to ceiling without having them custom made (btw, 1000's of dollars!). I found the circle print blackout curtains at Walmart of all places (I had to go to 2 stores to get enough) and then I bought some matching (or at least complementary fabric) at an awesome place that sells fabric in a where house-type store. Because I bought so much I even got a discount. I think it ended up being about $3 a yard!!!
It was a lot of work (although straight lines) to iron and sew all these, but it was worth it. I doubled the fabric to make it thick enough to hang properly.

try to ignore the paint job. we are not expert painters and i hardly notice it anymore!
I made the curtain rods from conduit. I've had this idea for a long time, but needed to find the right lengths. I finally figured out the math and the nice man at Home Depot cut them for me (although they said they do not usually do that). I bought the curtain rod "holder-upper things" and my husband helped hang them. Soooooo glad this project is done! It took over 2 and a half years to complete it!

Our house decorating has really taken a back seat to other things- basically, life. Mostly the fact that the husband and I have very different design aesthetics. It takes a LONG time for us to agree on furniture or decor purchases. He's traditional and I am modern, mixed with handmade and thrift store finds. He got to chose our bed frame and his bedside table (here) about a year ago (I chose the mattress here) and I chose my own bedside table, even though it is completely different. We chose our armoire and dresser a few years after we got married and we are both pretty happy with those.

Anyhow, we did not have matching bedside lamps. In fact my husband never has had a lamp since we got married! I can't live without mine since I read in bed. I've been using a milk glass lamp I received as a gift for the past 5 or so years. I still love it, but needed an update and I wanted matching ones to make up for the fact that we have different nightstands. I was browsing through Target the other day and found these awesome lamps and shades WITH a bulb attached!!! Each piece was only:
That means for $15 dollars I got two lamps, two shades and 2 energy star bulbs!!! AMAZING!!! And I got to sneak some modern in there! That's a lot of words for what I am trying to get across!  AWESOME DEAL and were getting closer to completing the bedroom decor! Not quite there yet, but getting there!
I did not notice the little price tag under the bed until after I uploaded the photos. Oh well!
His:
Hers:
Just a few more things to add. So in a few more years..... :) 

doily web

I am so excited about this simple little project I came across the other day on betz white's blog. Something about using a doily, which I usually would never do, and pairing it with a spider! I don't know: it speaks to me! Maybe I will use doilies in future projects...well, we'll see.

Here's my version:

For some reason, we are lacking in plastic spiders around here, so I made one from 2 black buttons, some rhinestones (for eyes) and legs made out of floral wire which I "painted" black with a Sharpie.  

 I spray painted the thrift store hoop white and hot glued on the thrift store doily from the other day. I cut around the doily for the parts I did not want. I thought it looked more realistic off center.
What a great idea! Thanks Betz!

thrift store finds

I scored at the thrift stores this week. Here are a couple of my finds.


Look at this cute little wooden owl. Anyone have any idea why there is a slit through his forehead? Is this a piece of something else? It makes a perfect companion to the other fall mantle decorations. I didn't even notice at the store, but it is almost a perfect match for our mantle and cabinetry stain. Wow!
He was only $1.50!


 I found this doily for 49 cents. I wanted a pure white doily to make this.  I already bleached it, but the blue did not go away. That's okay because the embroidery hoop I found at another thrift store (which I have outside drying from painting it white) fits just inside the circular part and I can cut the blue part off (sorry to the granny that labored over this!) 
UPDATE: you can find the doily web I made here.


I found a few other things too: flash cards, a stadium seat cushion (I've been wanting one for a long time, even though I doubt that if I put it on the ground right now, I could get out of it with this belly of mine) and this book and a toddler book of potty songs sung to tunes of familiar songs. I also found a box of Martha Stewart glittered blue ornaments for $3.99. Score! I can make another one of these ornament wreaths.

10.15.2011

reversible fall pillows and couch update

We have tufted pillows for our couch! I have been trying to do this project for over 4 years!!! I bought some fabric button cover kits a while ago, but the fabric I chose was too thick and I could not make the buttons so I gave up. My mom was able to get a few of them done, but not enough for all the pillows. Then I decided to make the buttons on the bigger pillows larger and use the smaller buttons on the little pillows. Joann's had a 40% off sale on all notions and I bought 10 more big button cover kits for the large pillows.
 I wish I had taken some before photos of the couches, and you would think I would have some, but I can't find any. It makes the couches look more sophisticated (at least I think so).

In addition, I decided to use different button fabric on each side. One is a tweed-look fabric and one is a microfiber (like the couches).


Did you notice the owl pillows on the couch? They are reversible too! My mom came over to help me make them. I still don't know how to put in a zipper (I know!). AND she advised me that the sweater material (made from one of my husband's sweaters I stole out of the to-go-to-charity-bag) needed some support so it would not stretch out. She used pieces of iron-on Stitch-Witchery to attach some cotton fabric on the back. Who knew? um yeah, my mom.
I used pillow forms I already had, my husband's old sweater and I think I bought the owl fabric last year for $5! The only things that were new are the zippers. My mom used invisible ones. From 1 yard of this owl fabric, I made the above two pillows, this bag and two smaller trick or treat bags: one for my son and one of my friend's daughter. What a deal! 


10.13.2011

baby dolls

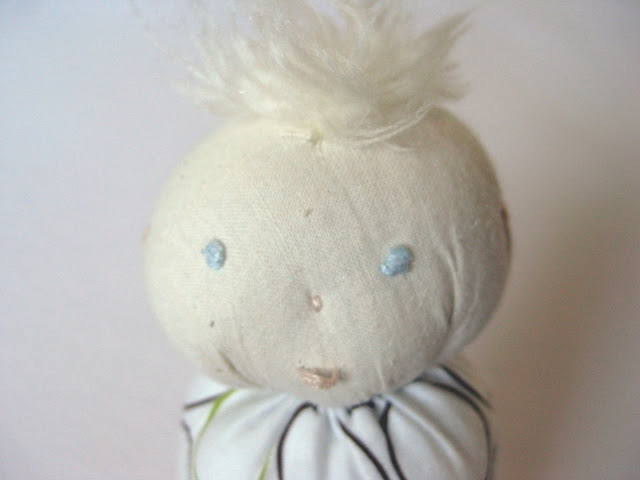
These little baby dolls are made from a left over pillowcase that I made into a baby blanket for a friend at work. I loved the pattern and kept the doubled over edge of the pillow case "just in case." It turned out to be the perfect fit as a baby doll body. I made one for my son (kind of in preparation for his baby brother and he must have picked up on that because he sleeps with him every night now and even called him his "baby brother." Cuteness! Oh yeah, did I ever mention we are having another boy? I can't remember...pregnancy brain again!
 My little baby (almost 3 years old!) said that the baby girl was "too shaky" and threw her out of his bed. He does not like her "shaky" hair. The little shaky girl is finding a new home with a friend's daughter. (To tell the truth, I originally made it for her, but then my son said he wanted it, and I thought I'd just made another one for the little girl!).
 In the end it all worked out!
The hair is yarn I used for my son's hobby horse. I knotted the yarn in the middle and stitched it on with regular thread.  The faces were made from scraps of fabric (cut into a circle and gathered into a ball) I already had and I embroidered the faces (French knots for the eyes, straight stitches for the nose and mouths). I love simple, fun projects!

10.10.2011

flower and bead necklace

Have you seen that fabric with flowers all over it? I can't seem to quickly find an example on the web, (whenever I search, just floral fabrics come up) but my sister-in-law in getting married and her daughter's (our niece) dress is made with an overlay of this flowered fabric. I was making a little pin for the flower girl out of the black flowers and had a few extra flowers to play with. A friend at work was wearing a super cute Anthropologie necklace that inspired this one. I can't find it on the website now, but the "chain" was made from a strip of sheer fabric. I had a scarf from my days as a hostess (my first job) so I cut one up and came up with this:

The beads are from a beloved necklace that broke. I sewed them on between some knots I tied as I could not string them on with a needle (too thick). I knotted some other random places and even sewed back back forth in a few other places. I like the asymmetry of it. I also love that it is lightweight because I cannot stand heavy stuff around my neck, especially during pregnancy!

10.03.2011

reversible halloween/fall bag

I've never made a reversible bag before, but I decided to last night because it seemed easier than another project I wanted to start, but realized it just was not going to happen without my mom's superior sewing assistance (more on that in a week or two when i get the help!). It took me a while with pregnancy brain to figure it out (I know, sad) but I did it after squeezing my eyes shut and visualizing and concentrating harder that usual. :)  All I can say is "I did it my way"--don't know if it is the correct way. In fact, I know it wasn't, but oh well, the end product is fine with me.


AND the cute owl pattern covers a multitude of sins!


10.02.2011

cowboy party ~ hobby horse

Our son turns 3 at the end of the month so that means it's time for party planning! We're going for a cowboy or wild west theme. It is fun because we get to incorporate his Halloween costume into whatever party theme we are having! That it until he let's me! I've been saving up some cowboy ideas that I've seen on the web for a while now and since October is jam packed with fun things to do, I needed to get a move on making his gifts and planning his party.

This first thing I made this weekend was a hobby horse. I first saw this tutorial on lightbluegrey (I love that name! and I love Hetty's header!). I saw another great tutorial on dandee, which I loved as well. I combined to two with things I had on hand.

The only things I had to buy were the socks and the stick. I bought the socks on clearance at Target for $2.00 (for 2 pairs so I get to wear one) and the stick I found at JoAnn's (which was cheaper than at Home Depot and the perfect length). I had a 40% off coupon so it cost about $2.00 as well. So for $4.00 I was able to make this hobby horse and give myself a pair of grey (my favorite color) socks!

I stuffed the horse's head and then felt it was not opaque enough, so stretched the 2nd sock of the pair over the top. For the eyes, I used some old buttons and added a hole punch of black paper for the pupil and glued it on top. The yarn I found a few months ago at the thrift store, knowing it would some day come in handy! Since I don't knit or crochet, I had no idea what I would use it for, but that is why thrifting is so great! You just know!

I can't wait to see what our son thinks of it!